Tutorial:Downgrade Edge/Chrome to Older Versions Without Data Loss + Disable Updates

Chrome browser downgrading.
As is known to all, browsers with the Chromium kernel will start restricting extensions that still use the Manifest V2 specification from version 127 onwards.
Extensions such as IDM, Greasy Fork Script Manager, and uBlock will all be affected, and will no longer be able to use their full features (especially ad-blocking extensions like uBlock) in the future 🤷🏻♂️

Although this issue won't occur for Edge for the time being, this restriction will eventually be implemented sooner or later in the future.

Recently, when I was using Edge Version 130, I frequently encountered a problem: whenever I switched back to the browser from other programs, it would freeze (taking a long time to recover). So, I figured I’d take this opportunity to downgrade the browser and stick with Version 127 for the long haul.
My computer had Edge Beta installed, so my initial thought was: Why not just install an old official release, migrate the data, and then disable updates? After all, there shouldn’t be any conflicts.
However, when I tried to run the old installer, an error pop-up appeared right away: "There is a problem with this Windows installer package. A program run as part of the setup did not finish as expected. Contact your support personnel or package vendor."
I searched for solutions to this error for ages but got nowhere. At one point, I even thought the installer file was corrupted, or that renaming the program had caused a verification failure. I even delved into issues like Edge’s domain verification and Group Policy installation permissions... All in all, it wasted my entire afternoon.
But guess what? In the end, I set up a virtual machine and tested repeatedly, only to discover this key point: As long as your computer has a relatively new version of Edge installed—whether you’re trying to run an old Beta or Dev version installer—you’ll get the error shown in the image above!
Later, I found a method online that involved using Group Policy to disguise Edge as the Enterprise Edition, then downgrading via Microsoft’s official Enterprise rollback tool. But first, my attempt to use this method failed. Second, the method itself was flawed: rolling back still caused all Edge data to be lost...
In my desperation to migrate Edge browser data without loss on my current setup, I racked my brain for solutions. Then, unexpectedly, one night while I was still troubleshooting, I came across a brilliant tip from a user on the 远景论坛 (Yuanjing Forum):

Why not switch to an old portable version of Edge? It’s still a downgrade, right? Plus, portable versions come with built-in update blocking—talk about killing two birds with one stone!
That said, migrating seamlessly from the installed version of Edge to the portable version is no easy feat. During the process, I almost lost my browser data.
In this tutorial, I’ll show you how to migrate to the portable version of Edge with nearly zero data loss—you’ll keep your bookmarks, extension settings, browsing history, and even your logged-in sessions!
Backing Up Browser Data
First and foremost, we need to back up the browser data!
While Edge has a built-in browser data sync feature—allowing you to sync bookmarks and extensions by logging back into your account when switching to a new computer—for absolute safety during the migration process, I recommend manually backing up the data as well. This is especially crucial if you have extensions installed locally, as Edge’s account service cannot sync these.
Backing Up Bookmarks & Extension Settings
To simplify subsequent operations, I’ve created a batch script for backing up key browser data:
After downloading the script, press WIN + R based on your browser version, then copy and paste the following path to open your browser’s user directory:
Edge: %LocalAppData%\Microsoft\Edge\User Data\Default
Edge Beta: %LocalAppData%\Microsoft\Edge Beta\User Data\Default
Edge Dev: %LocalAppData%\Microsoft\Edge Dev\User Data\Default
Next, place the Bat file I provided into this opened folder. Ensure Edge is completely closed (press Ctrl + Shift + Esc to open Task Manager and verify no Edge-related processes are running in the background).
Double-click the file to run it. The script will automatically back up key browser data files to your desktop (ensure there is sufficient free space on your C: drive).
Backing Up Locally Installed Extensions
Open Edge’s extension management page, scroll down, and find the section labeled "From other sources".
You’ll notice many extension icons here have a tan-colored icon in their bottom-right corner—these are extensions you previously installed locally.
If you still need these extensions, be sure to back them up manually in advance!
备份这些本地方式安装的扩展的方法如下:让我们找到这个扩展的 ID,选中将其复制
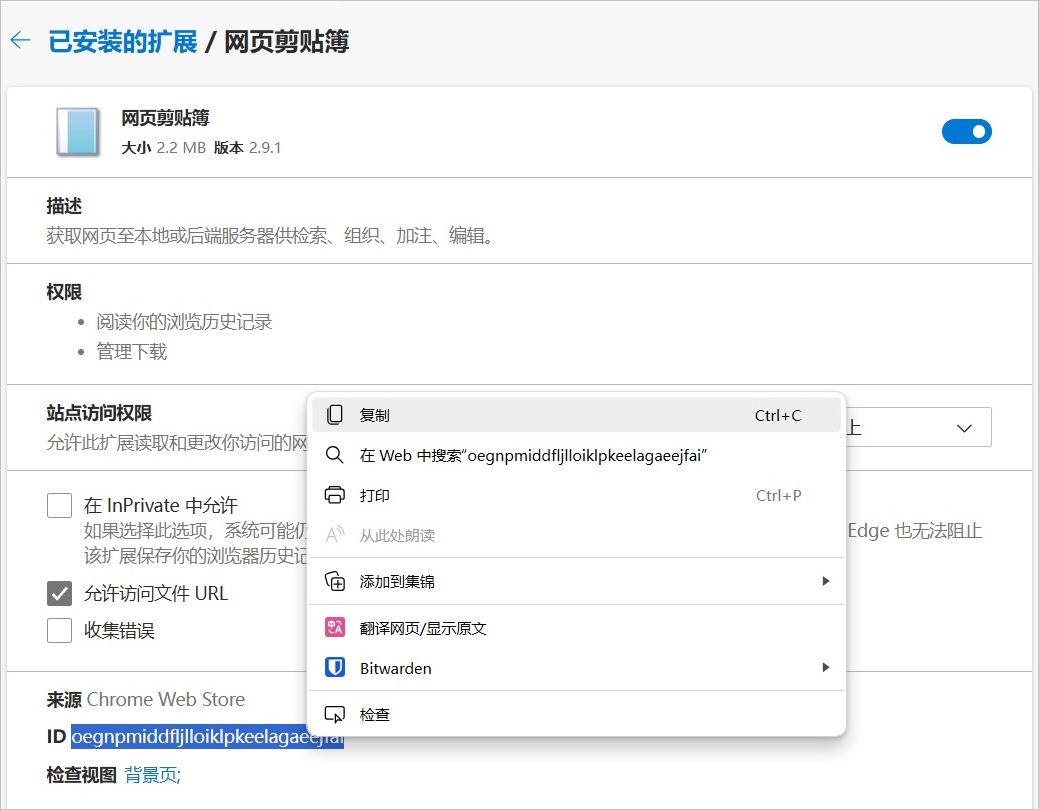
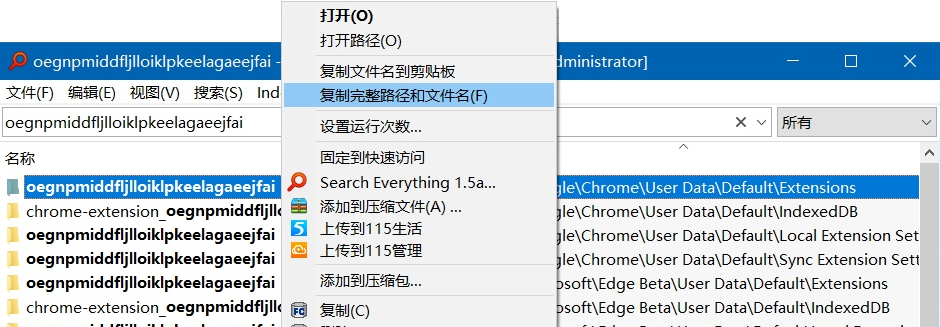
阿虚这里建议你装一个全盘文件搜索软件,比如 Everything(官网:),以便很方便的找到这个扩展所在的文件夹路径
注意,这里你会搜到很多这个 ID 的文件夹,具体要选择位于 Extensions 文件夹下面的那个。然后我们在 Everything 里面右键复制完整路径和文件名
找到 Edge 浏览器的扩展中心,选择打包扩展

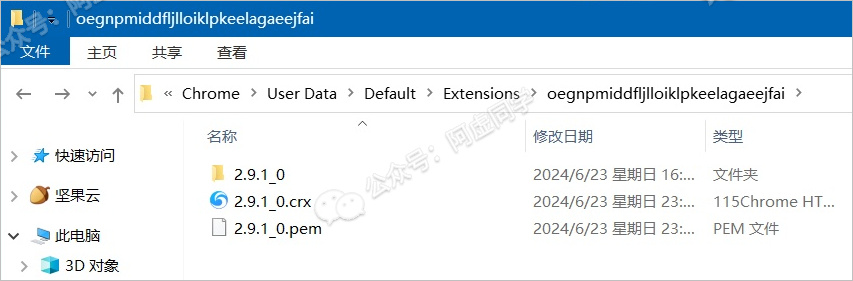
打包扩展这里,先粘贴刚刚复制的扩展所在路径,然后双击进入扩展的具体版本号文件夹(比如下图的2.9.1_0),然后选择这个文件夹,再点击打包扩展,就行了
最后再在资源管理器的地址栏,粘贴刚刚复制的路径(或者从 Everything 里面双击打开),在这里你就能看到刚刚备份的扩展文件了(.pem 文件可以删除)
PS:如果后续直接拖入无法安装,可以将.crx 文件的后缀重命名为 .zip,将其解压出来得到一个文件夹,随后在扩展中心改为选择「加载解压缩的扩展」一般就能解决无法安装的问题了
Migrating Edge Data
Once the data is backed up, we move to the most critical step: data migration. There are many portable versions of Edge available online—you can choose one that suits your preferences.
I am providing a portable version of Edge 127 (sourced from @奔跑中的奶酪). However, I have cleared the original built-in browser profile of the "Cheese Edition," so what you download will be a blank, default portable Edge 127 browser:
MicrosoftEdge 127.0.2651.98 Portable:
Google Chrome 127.0.6533.73 Portable:

Note: The method described in this article is also applicable to Chrome browser downgrading.
After extracting the files, double-click "开始.bat" (Start.bat) to create a shortcut in the current folder. Then double-click msedge.exe to launch the portable browser.

Step 1: Log In to the Portable Edge
The most critical operation here is: You must first log in to the portable Edge, then wait patiently for account data synchronization!!!
I encountered countless issues at this step. Initially, I would paste and overwrite the backed-up browser data first, then open the portable browser—only to find extensions missing, browsing history failing to sync, and various other problems (¯∇\).
A key point: The Preferences file (browser configuration file) cannot be backed up in the previous step, nor can it be overwritten into the portable version. Otherwise, version number conflicts in the configuration file may cause the portable browser to crash repeatedly.
▲ Log in to your account to start data synchronization
In short: Log in to your account and wait for a few minutes (or around 10 minutes if you have many extensions and bookmarks). Most of your data—such as bookmarks and browser extensions—should sync successfully.
If synchronization takes too long or fails to complete, go to Edge’s settings center and manually click "Resync", then wait patiently.
▲ You can see my extensions have synced
However, you’ll notice that all your extension data—such as scripts installed via Tampermonkey—is gone!
Don’t worry, the browser data we backed up earlier will come in handy!
Step 2: Overwrite Extension Configuration Data
First, close the portable Edge browser (press Ctrl + Shift + Esc to open Task Manager and confirm no Edge-related processes are running in the background).
Then, take the batch of files backed up to your desktop by the script and paste them into the Data/Default folder of the portable Edge (overwriting existing files if prompted).
Finally, open the portable browser again. You’ll find: All your scripts, extension configurations, and even web browsing history are back—and the login status for some websites that rely solely on local cookies for verification is also retained!!!
For websites where the login status is not retained, this is usually because the site uses more complex server-side verification (beyond just cookies). You’ll need to log in to these sites manually.
Fortunately, there’s a major advantage to this migration method: Your installed Edge browser can coexist with the portable version! You can open both browsers simultaneously to compare data and ensure no information is missing.
Setting the Default Browser
Next, let’s explain how to use PortableRegistrator.exe in the Tools folder.
The process is simple:
Under Portable executable, select msedge.exe from the App folder of the portable Edge (do not select the shortcut in the outer folder).
For Program Type, choose Web-Browser.
Customize the Program Name as you like.
Finally, click REGISTER.

To set it as the default browser: Right-click the Start button (bottom-left corner of your screen) » Settings » Apps » Default apps, then select the portable Edge as your default web browser.

You may see multiple Edge versions listed (as shown in the image above). To verify you’ve set the correct one: Open the browser, enter edge://version in the address bar, and check if the "Executable Path" and "User Data Path" point to the folder of your portable Edge.

Avoid browser crashes
Note that after migrating to the old version, if no specific settings are configured, the browser may crash later (as shown in the image below).
Browser extensions will prompt an error indicating a malfunction, and at the same time, all web pages fail to open properly. Even worse, all settings pages of Edge cannot be opened either—they all report errors!

For the specific solutions, please refer to this article:
Handling the Installed Version of Edge
However, if you’re a bit of a perfectionist or need to free up space on your C: drive, you can uninstall the installed Edge now to reclaim storage.
Uninstalling the Software
First, I’ll introduce a more manual method—but theoretically, it’s the most universal.
The reason why newer Edge versions cannot be uninstalled directly from the system is that Microsoft quietly removed the uninstall function from Edge installers starting around version 100.
However, we can solve this with a "switch-and-replace" trick: Simply use an Edge 9X version installer (which still has the uninstall function) to replace the new version’s installer.
Open File Explorer and navigate to: C:\ProgramData\Microsoft\Windows\Start Menu\Programs
Find the Microsoft Edge shortcut, right-click it » Properties » Shortcut » Open File Location.

Open the folder named after the Edge version number, then open the installer folder inside.

Download the old setup.exe installer here:https://rapidgator.net/file/2477ff2428e1ad4cf7e75d79e88127bf/setup.exe.html
Replace the original setup.exe file in this directory with the downloaded one.

In the address bar of File Explorer (for the current installer folder), type CMD and press Enter.
Paste the following command and press Enter to run it: setup.exe --uninstall --system-level --verbose-logging --force-uninstall

The above method is a bit manual and cumbersome. Alternatively, you can use specialized software to uninstall Edge. Here are two recommendations::
:
Edge Remover:
Note: When using the above software, do not accidentally uninstall the Edge WebView framework. This component is now heavily relied on by Office, as well as Microsoft’s built-in widgets (e.g., Weather).
Cleaning Up Residues
The above steps only uninstall the browser itself—the user files (which take up most of the space) are not deleted.
You need to manually open this folder in File Explorer: %LocalAppData%\Microsoft\, then delete all Edge-related folders.

Additionally, if you used the two software tools mentioned above to uninstall Edge, residual files may remain in the C:\Program Files (x86)\Microsoft folder—you’ll need to delete these manually.
Comments
Post a Comment